


")


 Tokens Playing This P2E Game")
")
The Balancer protocol V2 allows you to create custom weighted pools. With no less than up to eight tokens. This opens up plenty of passive income options. Furthermore, you can customize the weighted pools.
The Balancer V2 AMM has a TVL of $3.34 billion according to DeFi Llama. This puts them in the 13th spot of all platforms. Today we are going to show you how to set up a custom weighted pool.
Multiple tokens ✅ Customizable weights ✅ Set your swap fees ✅
Create your own customized Weighted Pool on Balancer V2 in 4 easy steps 👇 https://t.co/bWLFTXMhy3
— Balancer (@Balancer) April 5, 2022
What Are Balancer V2 Weighted Pools?
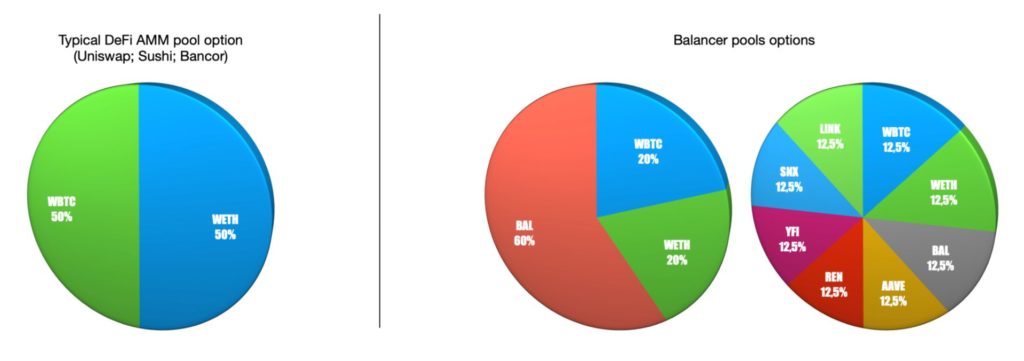
One of the advantages of a weighted pool is that you can configure them. Furthermore, they are very flexible. A standard AMM uses a 50/50 weighting in a pool. However, on Balancer you can build a pool with different tokens and weightings. For example, 60/20/20 or any other variation with up to eight tokens. But also a two-token pool with a 70/30 weight is possible. For more information about Balancer, have a look at our recent article.
In a weighted pool, the token with the highest weight is the least exposed to impermanent loss. Pending on your strategy, you weight the tokens in your pool accordingly. Furthermore, the more tokens there are in a pool, the more swaps are possible. As a result, this generates more income.
Source: Balancer docs
How to Set Up Your Custom Balancer V2 Weighted Pool in 4 easy steps?
You can set up a custom weighted pool on Balancer to your very own preferences. Anywhere between 2 and 8 tokens are possible.
- So, you first need to decide which tokens you like to add. This is most likely influenced by the strategy you like to follow. Anything goes, as long as the tokens are available on Balancer.
- Adjust the weighting for each individual token to your liking. Click ‘next’ and you can set your swap fee on the next screen. A typical fee is 1%. You can opt to make it a permanent fee for this pool.
- Check if the display shows all tokens in the correct way. This will bring you to the preview display.
- Connect your MetaMask or another wallet that you prefer. Now all transactions need to go through, for all selected tokens. This may take some time in case you have many tokens in your pool. The transaction consists of approval for all tokens. In addition, the pool deployment, and of course, the funding of the pool you deploy.
Well done, you created the pool. Providing that your wallet approved all transactions. If you like to see the newly created pool, click on the ‘view pool’ button. This takes you to the front end or UI of Balancer.
On the right-hand side, you can see the pool balance. Information like, volume, fees, and APR is in the middle of the screen.
Conclusion
Now you see how weighted pools work. Furthermore, in 4 easy-to-follow steps, we explained how to set up a custom weighted pool. This will help you with exposure control over your tokens. In addition, they can complement and help you with your DeFi trading strategy.
Finally, for more cryptocurrency news, check out the Altcoin Buzz YouTube channel.
Find the most undervalued gems, up-to-date research and NFT buys with Altcoin Buzz Access. Join us for $99 per month now.


