


")


 Tokens Playing This P2E Game")

You most likely heard already about the so-called “Ethereum killers.” These are blockchains that offer fast and low-cost transactions. They are also scalable. These are all features that Ethereum currently doesn’t have. Avalanche is among this group of supposed Ethereum killers.
So, let’s have a closer look at what Avalanche is all about. Here’s a short video about Avalanche.
Top Three Avalanche Explorer Tools
Like any other blockchain, Avalanche has explorers. The architecture of Avalanche shows a primary network, with three chains. This is to help handle the blockchain trilemma. There are the:
- C-chain, which hosts smart contracts.
- P-chain, this manages validators and custom subnets. Here you can also stake.
- X-chain, the exchange chain. To create and exchange assets.
However, there are also Subnets. This is where validators work together. They take care of the consensus of various blockchains. These Subnets can validate more than one blockchain. However, each blockchain only has one Subnet as a validator. They divide networks into smaller units. This makes them more manageable.
There are plenty of transactions and new blocks on the Avalanche chains and Subnets. That’s where the explorers come in. We have a closer look at three explorers. For instance:
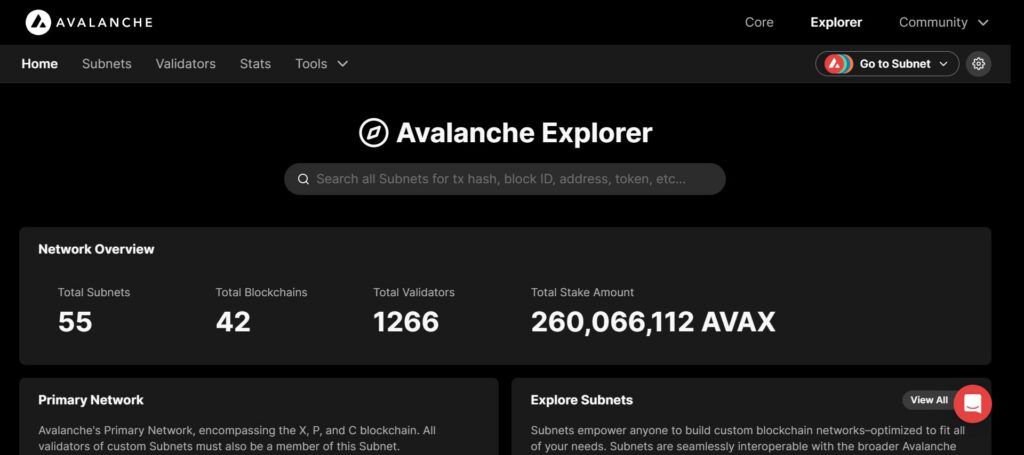
This explorer has information about Subnets. It also offers information on validators and other network stats. It has 55 Subnets that look after 42 blockchains.
This explorer is for the C-chain. It’s like Etherscan, the popular Ethereum explorer. However, it is custom built for Avalanche.
With this explorer, you can search for anything on Avalanche.
The picture below shows the Subnet explorer.
How to Use Avalanche’s Explorer Tools
The Avalanche explorers show you all on-chain transactions. However, it can also offer information on new blocks. The same way as other chains have similar explorers.
The explorers on Avalanche are easy to use. You can use any of the following search criteria. This helps you find the relevant information you’re searching for. For example:
- Wallet addresses
- Hash transactions
- A block ID
- Token addresses
- Name tags
- Labels
- Or any other relevant information
Each explorer has a few slightly different features. For instance, the Subnet Explorer shows all Subnet transactions. Once you enter a wallet address, a dropdown menu appears. This shows where the wallet was active. SnowTrace only shows information about the C-chain. On the other hand, Avascan allows you to search in 13 different networks.
Here are links on how to best use each individual explorer. For The Subnet Explorer, this page works great. Here are the docs for SnowTrace and Avascan, respectively.
The following video shows how you can print out 10,000 transactions from the Subnet Explorer in a .CSV file.
How to Buy AVAX
You can buy the AVAX token on all the big exchanges. This includes DEXs and CEXs. We also have a look at a popular exchange in each category on how to buy AVAX. For a CEX, we look at Binance. The DEX of choice is Trader Joe. So, let’s start.
Binance
So, buying AVAX is straightforward on Binance. Follow these steps or check their guide.
- Open a Binance account or login to your existing account.
- Once logged in, click the “Buy Crypto” tab. See the picture below. It shows you the available options in your country. Here we have, for example, bank deposit, credit or debit card, or with your cash balance. Another option is P2P trading or peer-to-peer. This you can find under the “Trade” tab. Now you can trade directly with other Binance users.
- Your best option may be to buy a stablecoin like USDT or USDC. With this stablecoin, you can continue to buy AVAX.
- Check the details of the payment and the associated fees.
- Confirm your order.
- Congratulations, you managed to buy AVAX on Binance.

Source: Binance
Trader Joe
This is a native DEX. However, it’s now also available on Arbitrum and the BSC chain. To buy AVAX on Trader Joe, follow these steps or check this guide.
- Install an EVM compatible wallet, like MetaMask or Rabby.
- You need to install the C-chain on your wallet.
- Make sure you have other crypto assets in your wallet to buy AVAX. Ideally, a stablecoin like USDT or USDC.
- Click the “Trade” tab on the app. See the picture below.
- Fill in quantity to swap.
- Review transaction fees and price details.
- Confirm the transaction in your wallet.
- That’s it, you bought AVAX on Trader Joe.
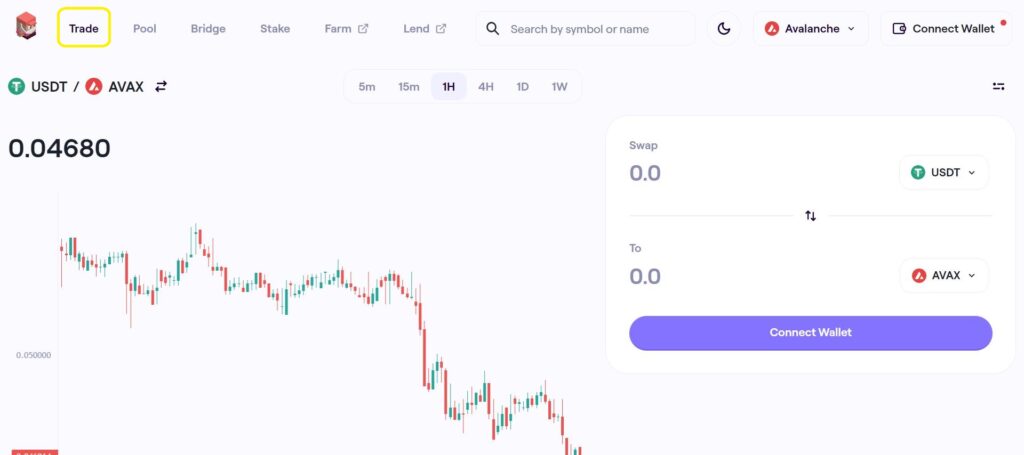
Source: Trader Joe
Conclusion
This is the first part of our Avalanche beginner’s guide. We looked at Avalanche explorers and how to use them. Furthermore, we looked at how to buy AVAX on Binance and Trader Joe. These are a CEX and a DEX, so, centralized and decentralized. To learn more about Avalanche, read Part 2 of our two-article series.
The current price of AVAX is $21.03. Its market cap is $6.86 billion. The max supply of AVAX tokens is 720 million. The total supply is 422 million. 326 million AVAX tokens already circulate.
⬆️ For more cryptocurrency news, check out the Altcoin Buzz YouTube channel.
⬆️ Our popular Altcoin Buzz Access group generates tons of alpha for our subscribers. And for a limited time, it’s Free. Click the link and join the conversation today.
 Ecosystem Updates")

