


")


 Tokens Playing This P2E Game")

Did you know that Binance Smart Chain users can now transfer their tokens To the Polygon network? Using XPollinate bridge will let users connect with their Web3 wallet and transfer stablecoins, i.e., USDC, USDT, and DAI, between multiple EVM-based chains. The transaction is speedy, and the fee is very low.
Currently, the XPollinate bridge supports the xDai chain, Polygon, Fantom, and BSC Network. In this guide, we will explain how you can use the XPollinate bridge to transfer your tokens from the BSC network to the Matic network.
For instance, you can read our previous guide on transferring your tokens from the Ethereum network to the Binance Smart Chain network.
It’s important to mention that the xPollinate bridge is in the Alpha release version. So take utmost care while using it.
Usage Guide
At the time of writing the article, the XPollinate bridge was experiencing some issues with V2 transactions. Therefore, we tried with the V1 bridge.
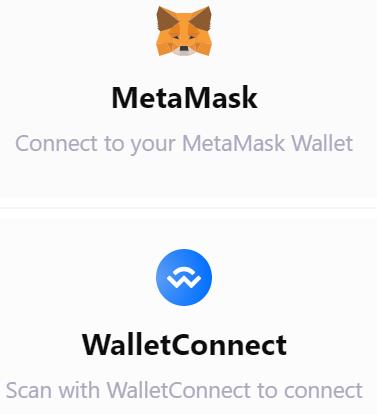
Firstly, you need to connect your wallet. The bridge currently allows you to connect using two wallets: Metamask and WalletConnect.
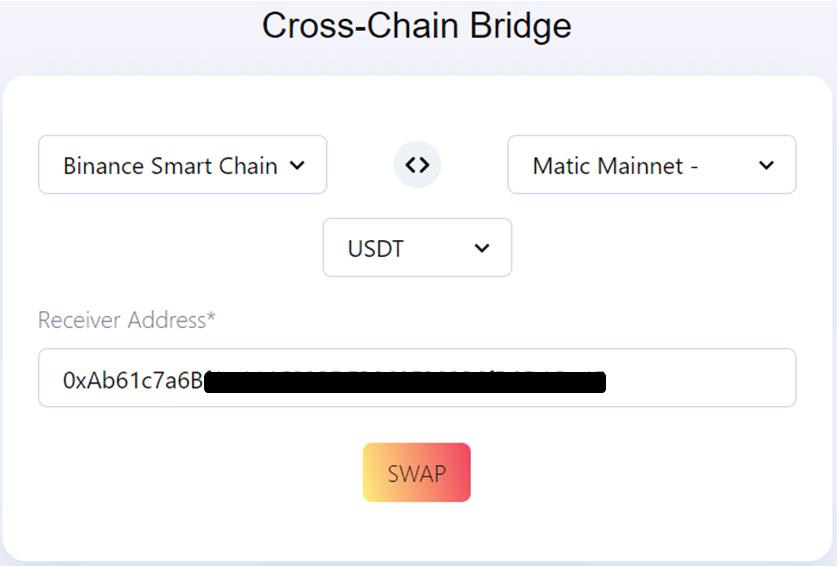
Once you connect with your desired wallet, set it to Binance Smart Chain network. The below page will appear where your need to fill in the following details related to your transfer:
- Source Network
- Destination Network
- Token/Coin for conversion
Further, the receiving address will be filled in by the application. It is the address where you will receive your tokens after transferring them to the destination network.
Also, users are required to set up a destination network in their selected wallets, just like the picture below.
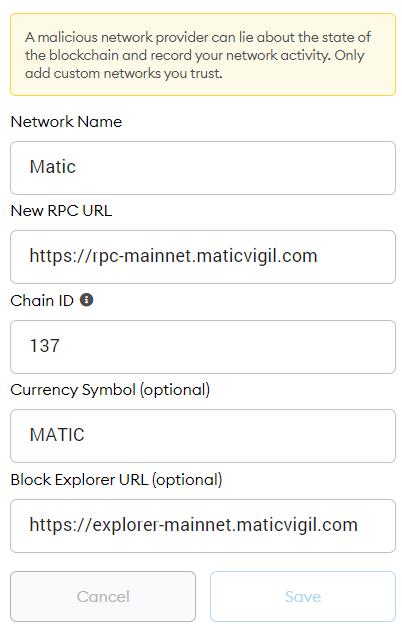
Secondly, if you have already set up Matic network details in your Metamask wallet, you can skip this step. Otherwise, use the following details to set up the Matic network.
- Network Name: Matic
- New RPC URL: https://rpc-mainnet.maticvigil.com/
- Chain ID: 137
- Currency Symbol: MATIC
- Block Explorer URL: https://explorer-mainnet.maticvigil.com
Moreover, to add the network, go to Settings, click on Add Network and fill in the above details (see screenshot below).
Once you have fixed all the above details, click on the Swap button.
Next, the user must fill in the amount of the tokens they wish to transfer. You can check the estimated fee and the amount you will get at the destination address. See the picture below.

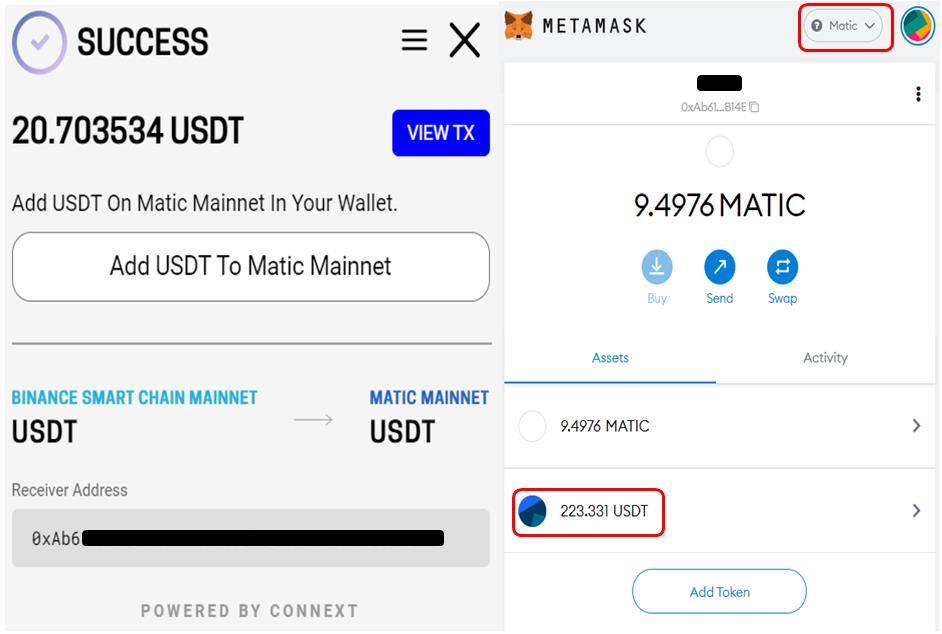
Confirm the process by hitting the Swap button. This will trigger a Metamask transaction that you need to confirm.
Once the transaction is successful, you will receive a success message. Then, click on the Add USDT To Matic Mainnet to add the token to your wallet. Just like in the picture below.
You can follow similar steps to transfer DAI and USDC to the different supporting networks.
Join us on Telegram to receive free trading signals.
For more cryptocurrency news, check out the Altcoin Buzz YouTube channel.


 in Q1-2022?")
can I transfer my bep20 wspp to wspp polygon with this also