


")


 Tokens Playing This P2E Game")

Worldwide Asset Exchange or simply WAX, is considered one of the most energy-efficient networks. It is among the leading NFT platforms that allow users to create, buy, sell, and trade virtual assets. As per their report, the WAX Blockchain uses a delegated Proof of Stake mechanism which is 125,000x more energy efficient and uses less than 0.00001% energy as compared to PoW-based chains, such as Bitcoin and Ethereum. In 2021, the network has received a Carbon Neutral Certification award from Climate Care.
According to dappradar, the WAX Blockchain has more than 325k daily users and processes over 15 million transactions each day.
In this article, we will explain in detail the different wallets that support the WAX Blockchain. So, if you are a user who wants to explore any WAX-based dapps, but, are not sure what is the best wallet you should use, then read this article. In the end, you will be able to decide what wallet will suit your purpose.
Table of Contents
Different Wallets of the WAX Blockchain
Below are the famous wallets that you can use to connect with the WAX network:
- WAX Cloud Wallet- The WAX Cloud Wallet is the most famous wallet that users can use to connect with the WAX network. The wallet allows you to connect with numerous WAX-based dApps along with the support of NFTs.
You can read our previous guide on how you can set up and use the WAX Cloud Wallet
- Hardware Wallet- Hardware wallets are the best to store your assets safely. Note that if you wish to store WAX in Ledger, you have to install the EOS application in your Ledger device as there is no WAX application available for the ledger. Users now need to generate keys using Scatter wallet (ledger does not support keys generation). Users can then import the keys into your Scatter wallet from the Ledger device.
- Anchor Wallet- Anchor wallet is a secured, privacy-centered, open-sourced wallet that allows you to connect with EOSIO-based networks. The wallet was developed by Greymass and it is available for various operating systems including Windows, Linux, macOS, etc.
So, in this article, we will explain how you can install and set up the Anchor Wallet.
Access The Anchor Wallet
To access the Anchor wallet, visit the official website of Anchor Wallet . Scroll down the main page and you can see the below screen.
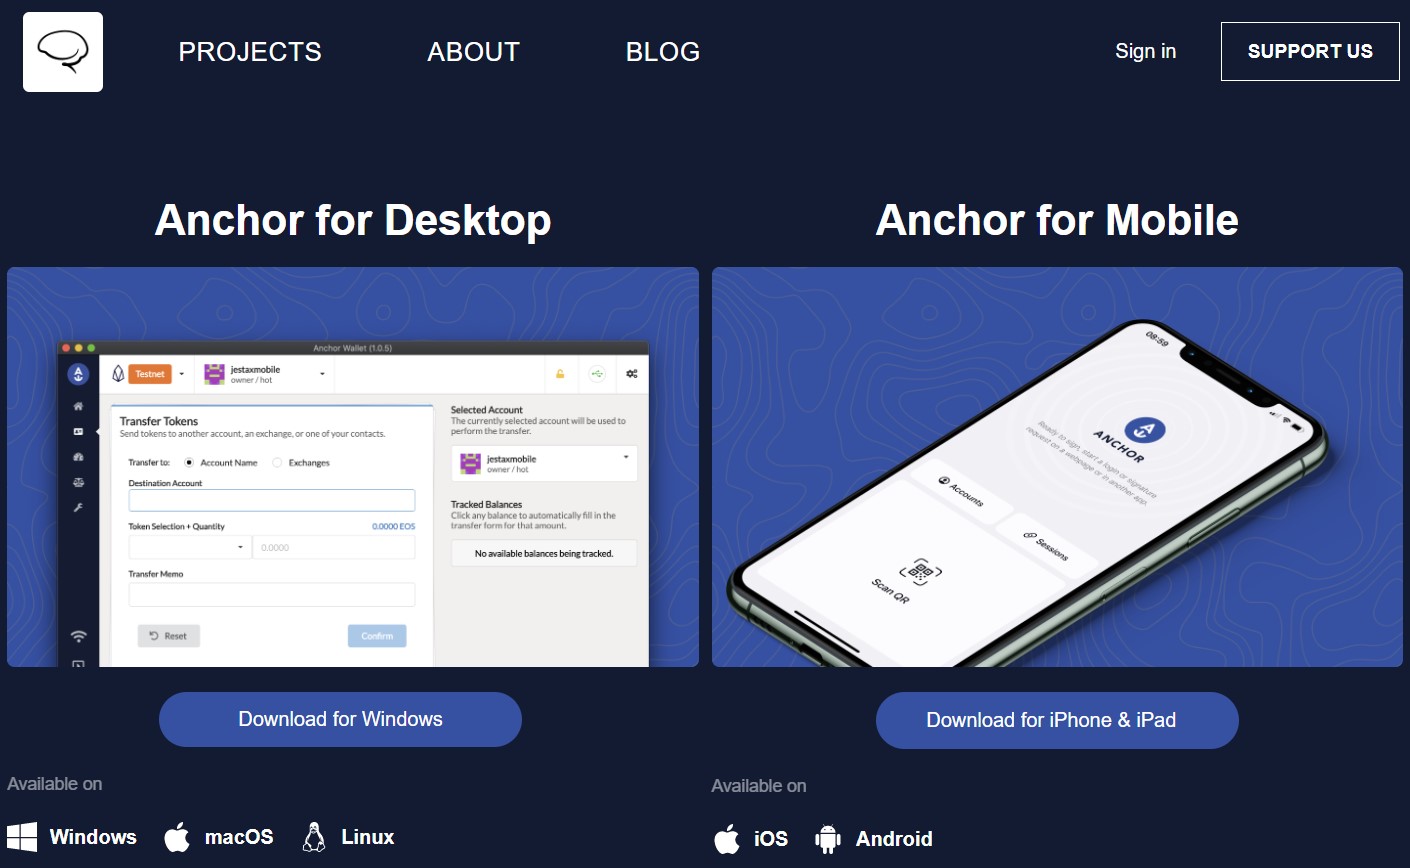
As given, users can download the wallet application for Windows, macOS, and Linux for the Desktop version. Mobile users can install it on their Android, or iOS devices.
We will explain how you can install the application for Windows operating system (desktop version).
Install The Anchor Wallet
To install the wallet application for Windows, click on Download for Windows (see the above screenshot). A .exe file will get downloaded to your local system. Run the .exe file and complete the installation process.
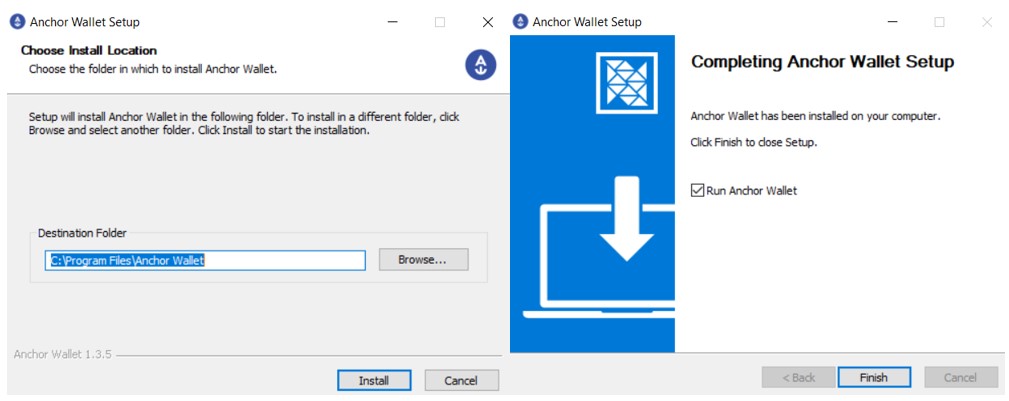
You can now find the Anchor wallet icon appearing on your desktop.
Set Up Options for Anchor Wallet
Click on the application icon to launch and set up your Anchor wallet. Here you will find the below three options for wallet setup:
- Setup An Account- Helps you in creating a new Anchor wallet account
- Import Anchor Backup File– Import an existing account by giving the backup file
- Recover Account- Import an account by giving the key certificate details
Setup An Account
Select this option if you want to create a new Anchor wallet account. The application will ask you to set up your wallet’s password first. Next, it will prompt you to select the network that you want to access.
Anchor wallet allows you to connect with the below different networks:
- EOS
- FIO
- Proton
- Telos
- WAX
Users can find a few more network (main-net and test-net) options to connect to in the drop-down.
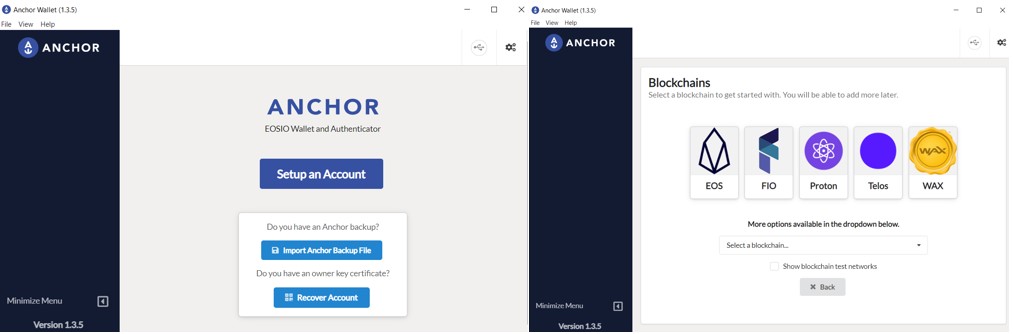
Select your desired network. We will connect with the EOS network. You can follow the same steps to connect to any of the supporting networks.
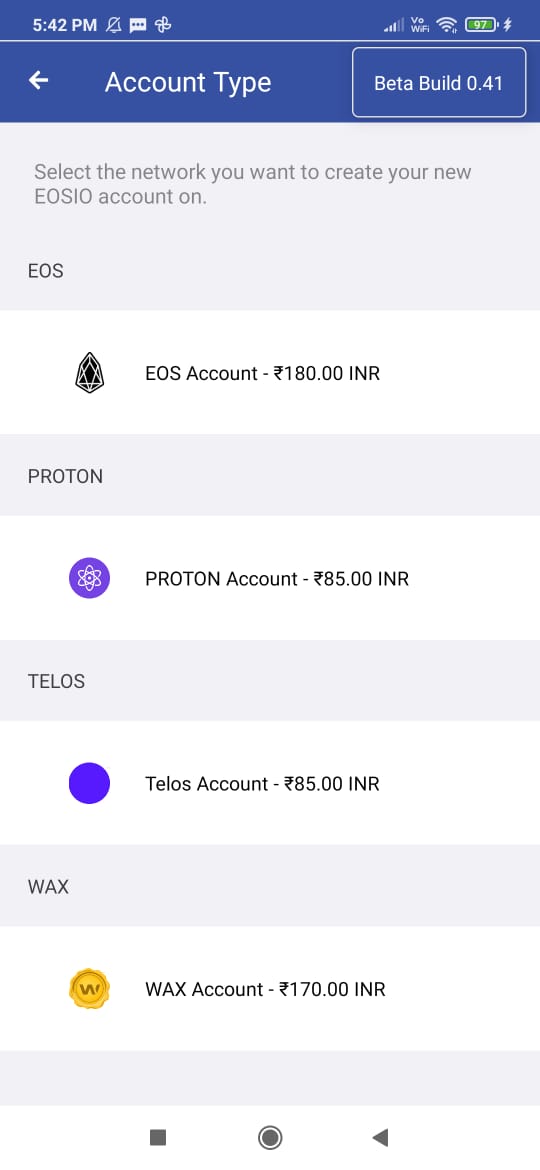
Note: Don’t get surprised if you do not find the create account option in your Anchor wallet. This is due to the reason that the wallet application charges a fee for account creation. Users have to pay USD 1.99 to create an account in the EOS network. You can check the mobile (Android) version to know the charges for account creation on a different network (see the below screenshot, taken from the Anchor mobile wallet application).
 How To Pay To Create An account
To pay the charges of account creation, users need to visit the link. You can find the Create New Account button. Click on it.
Next, you need to select the network where you want the account. Depending upon the network, the application will display the amount (in USD) that you need to pay (see the below steps for the process).
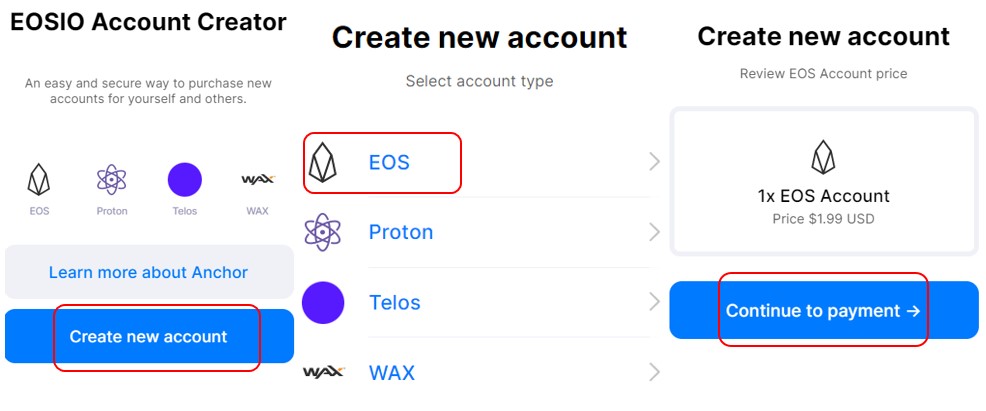
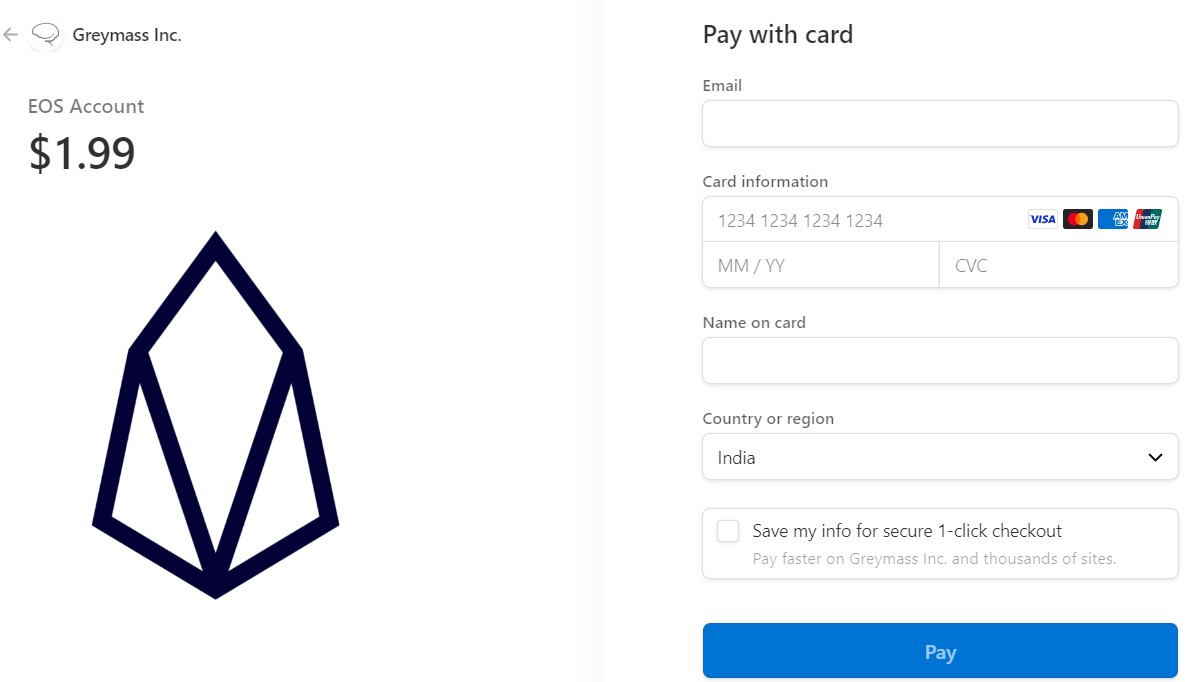
Click on Continue to payment, and the payment window will appear. Enter your card details and approve the payment process.
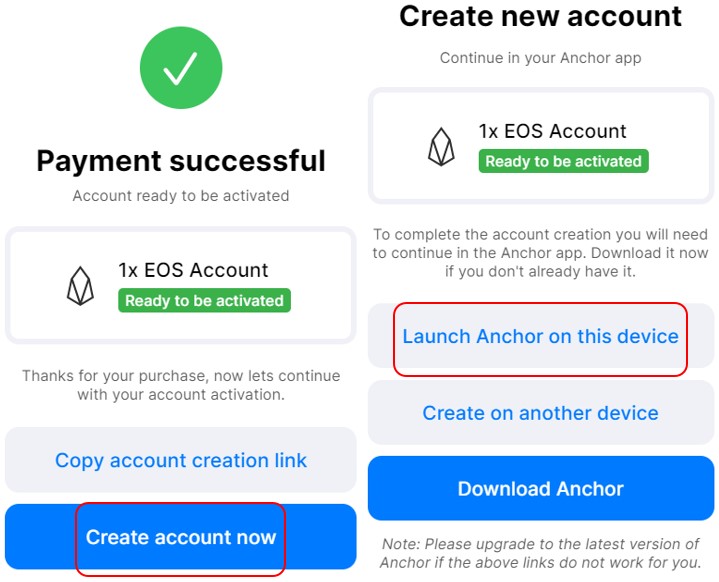
You can see the payment success message on your screen containing the Create Account Now button.
Click on it. You can now get the below options to create an account (follow the steps shown in the below screenshot).
Create an Anchor Account
As we have already installed the Anchor wallet on the same computer we will select the Launch Anchor on this device button (see above screenshot).
To create an EOS account, you can check the availability of your desired name/word in the Account Name field.
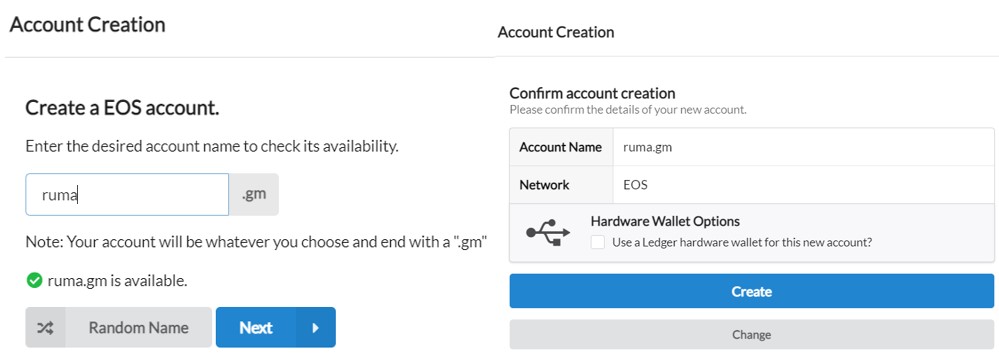
Users’ names are unique and will have a suffix of .gm. If it is available, you can confirm the account creation process. Otherwise, you can search for another unique account name. Once your account is created, you will get the below success message.

Account Back Up
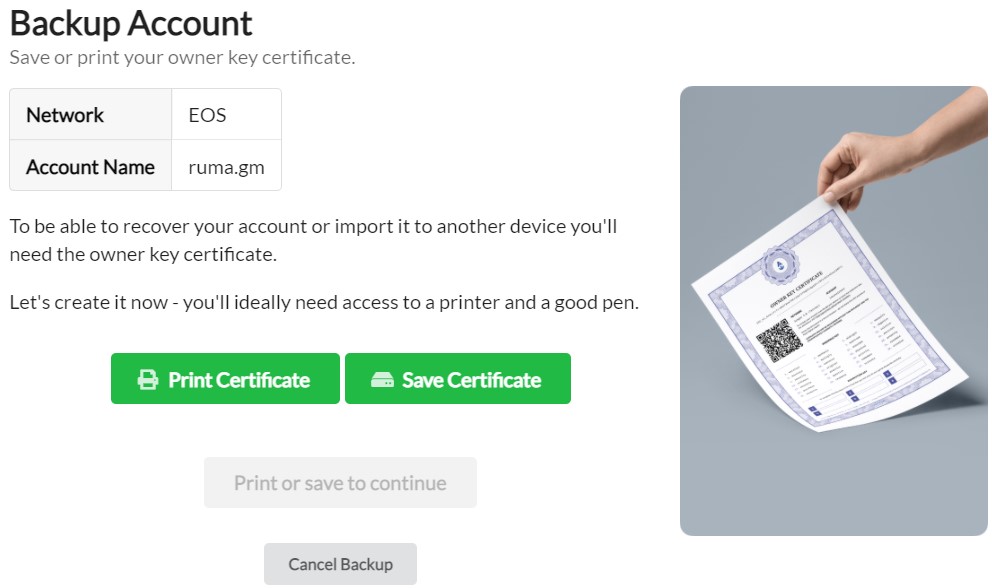
We always suggest our users take back up their wallet account immediately when they create a wallet.
To take a backup, click on the Create Backup button as shown in the above screenshot. The application will display a 6-word keyphrase and ask you to verify the keyphrase.
Once this is done successfully, users will get the option to print or save the certificate.
A certification is a document about the user’s account, and it consists of the mnemonic key, a QR code, and, and a long alphanumeric address.
The owner’s key certificate will look like this.
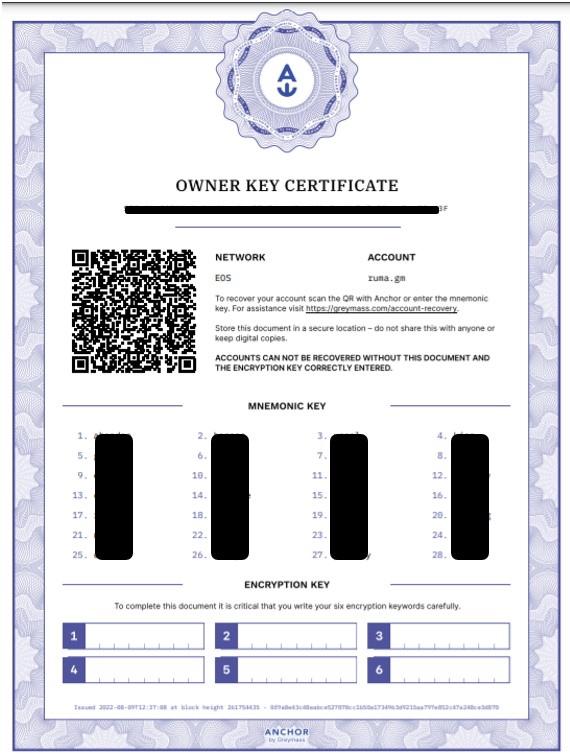
Note that, to recover an account, users require the 6-word encryption key and the details given in the certificate. Therefore, store your encryption key and the certificate in a safe place.
Landing Interface/ Account Overview
Once you have saved the certificate, you will be redirected to the wallet landing page. Here, you can find the below tabs:
- System Token- Shows the token balance of the native selected blockchain network
- Tokens- Select, track, and manage any EOS network token
- Resources- Check resource (CPU, RAM, and net) usage breakdown of different accounts in the EOS network
- Governance- Check the governance statistics of various accounts in the EOS network
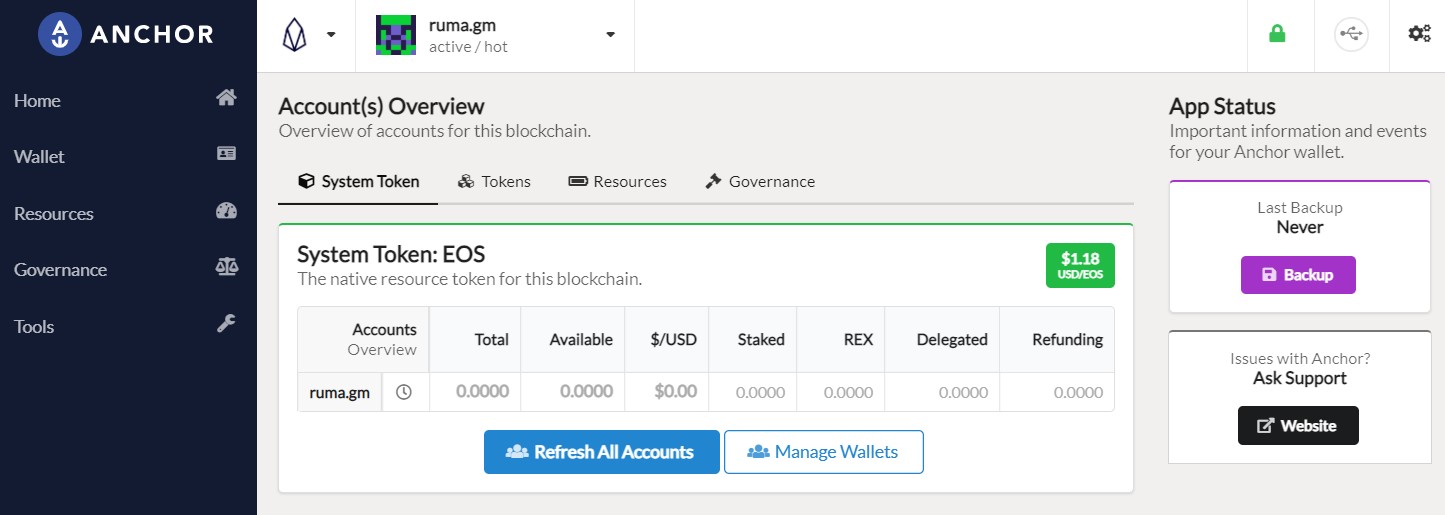
You can also see the Backup button (on the extreme right side of the pane). Click on it to save the .json file in your local drive.
Import Account
Users can import their existing EOS accounts into the Anchor wallet.
To import an account, click on Manage Wallet. You can now see the Import Wallet button. Once you click on it, you will find the various options using which you can import an account:
- Import via Private Key
- Enable Ledger support
- Import from Key Certificate
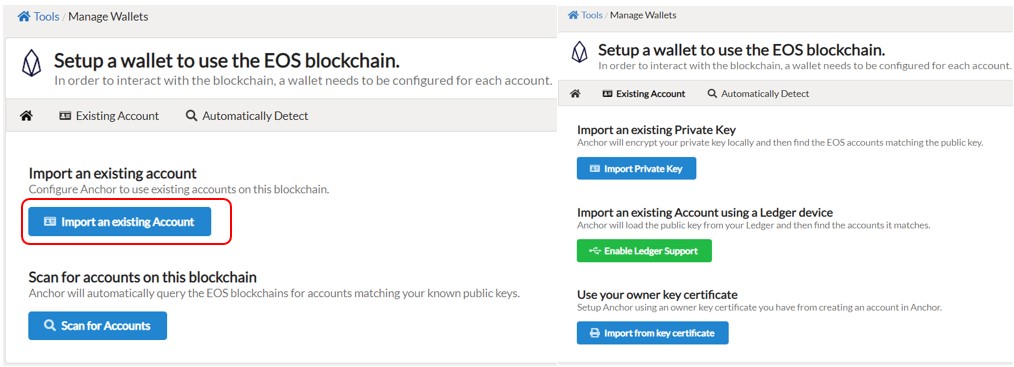
Users can select any of the above options and after providing the key details correctly, your wallet will be imported.
Wallet
Under the Wallet tab, you can find the option to transfer assets to some other wallet address.
To initiate a transfer process, users need to provide the below details:
- Destination address
- Token and its amount
- Transfer Memo
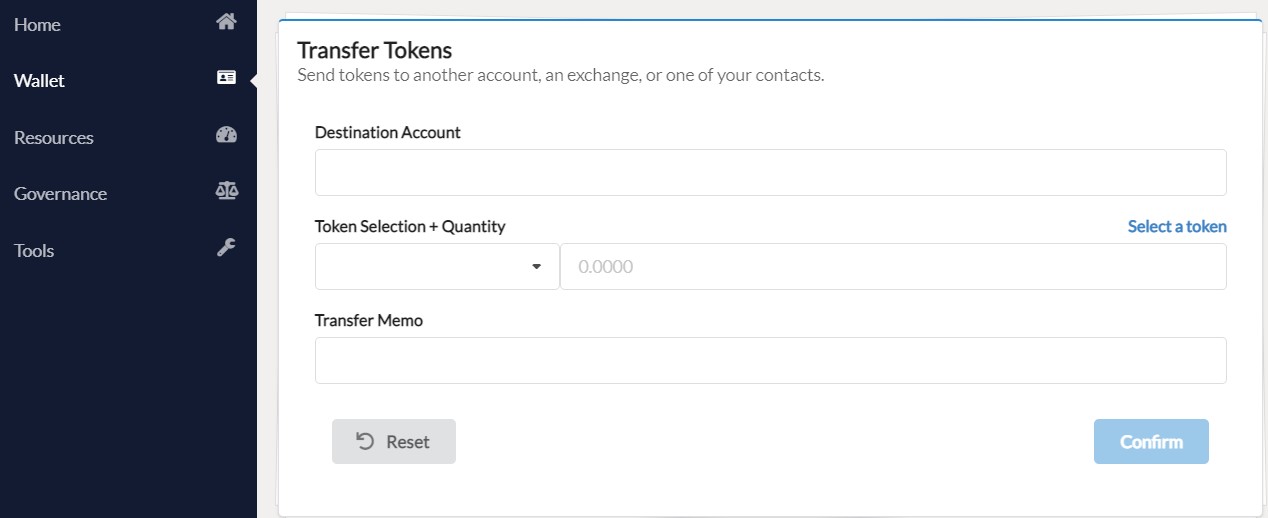
Confirm the process after filling up the details.
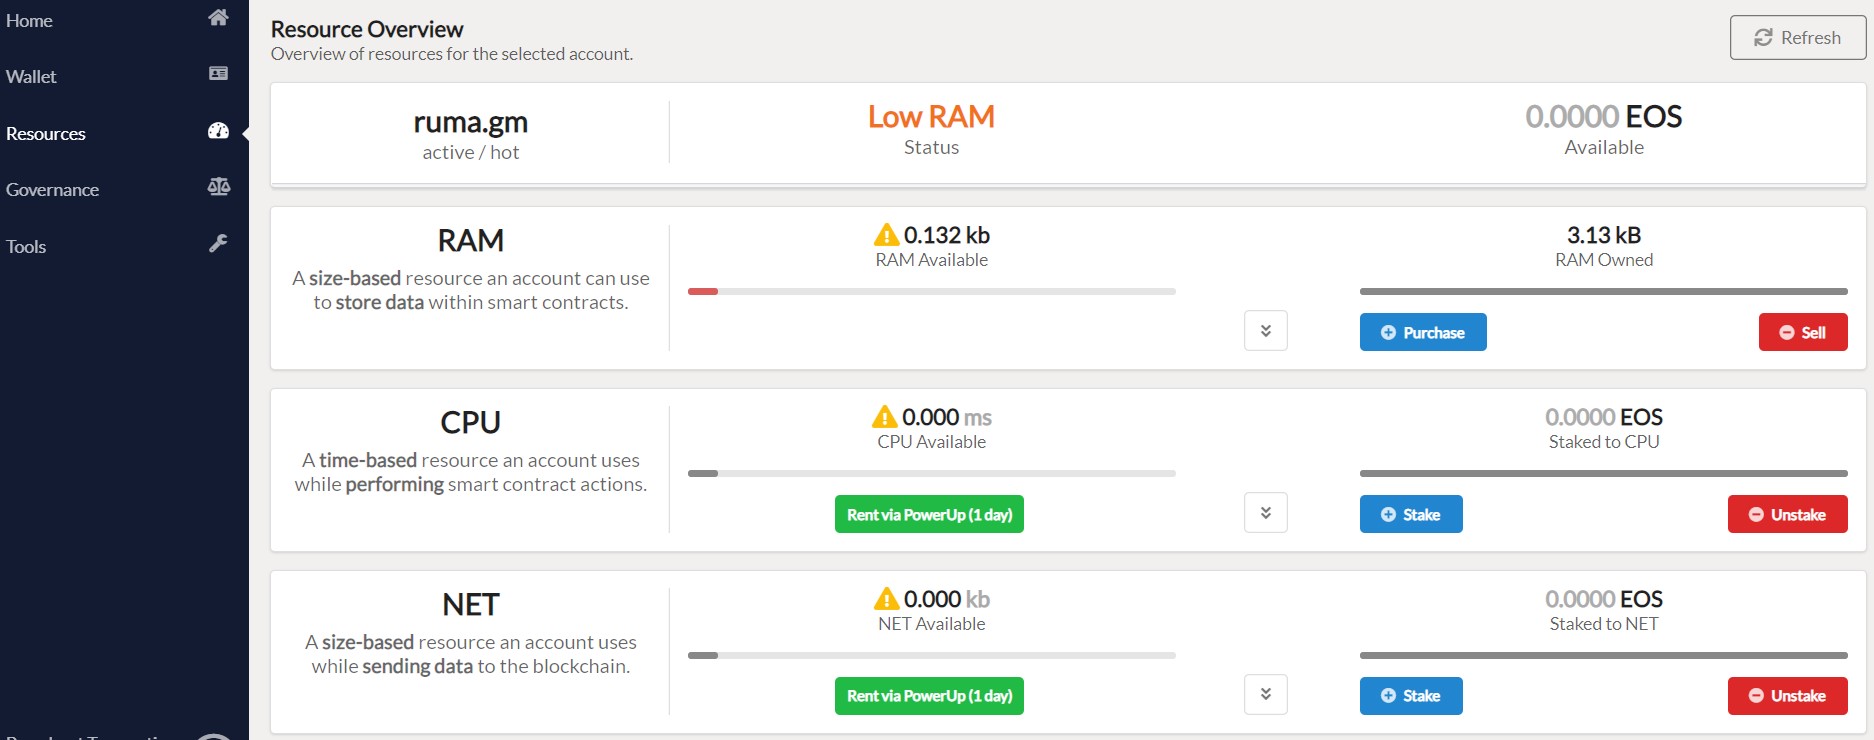
Resources
From the Resource tab, you can check the Resource (CPU, RAM, and NET) status. Each resource is required to do a particular task. Whenever a user runs out of resources, they can come to this section, and purchase the desired resources by giving the EOS coin.
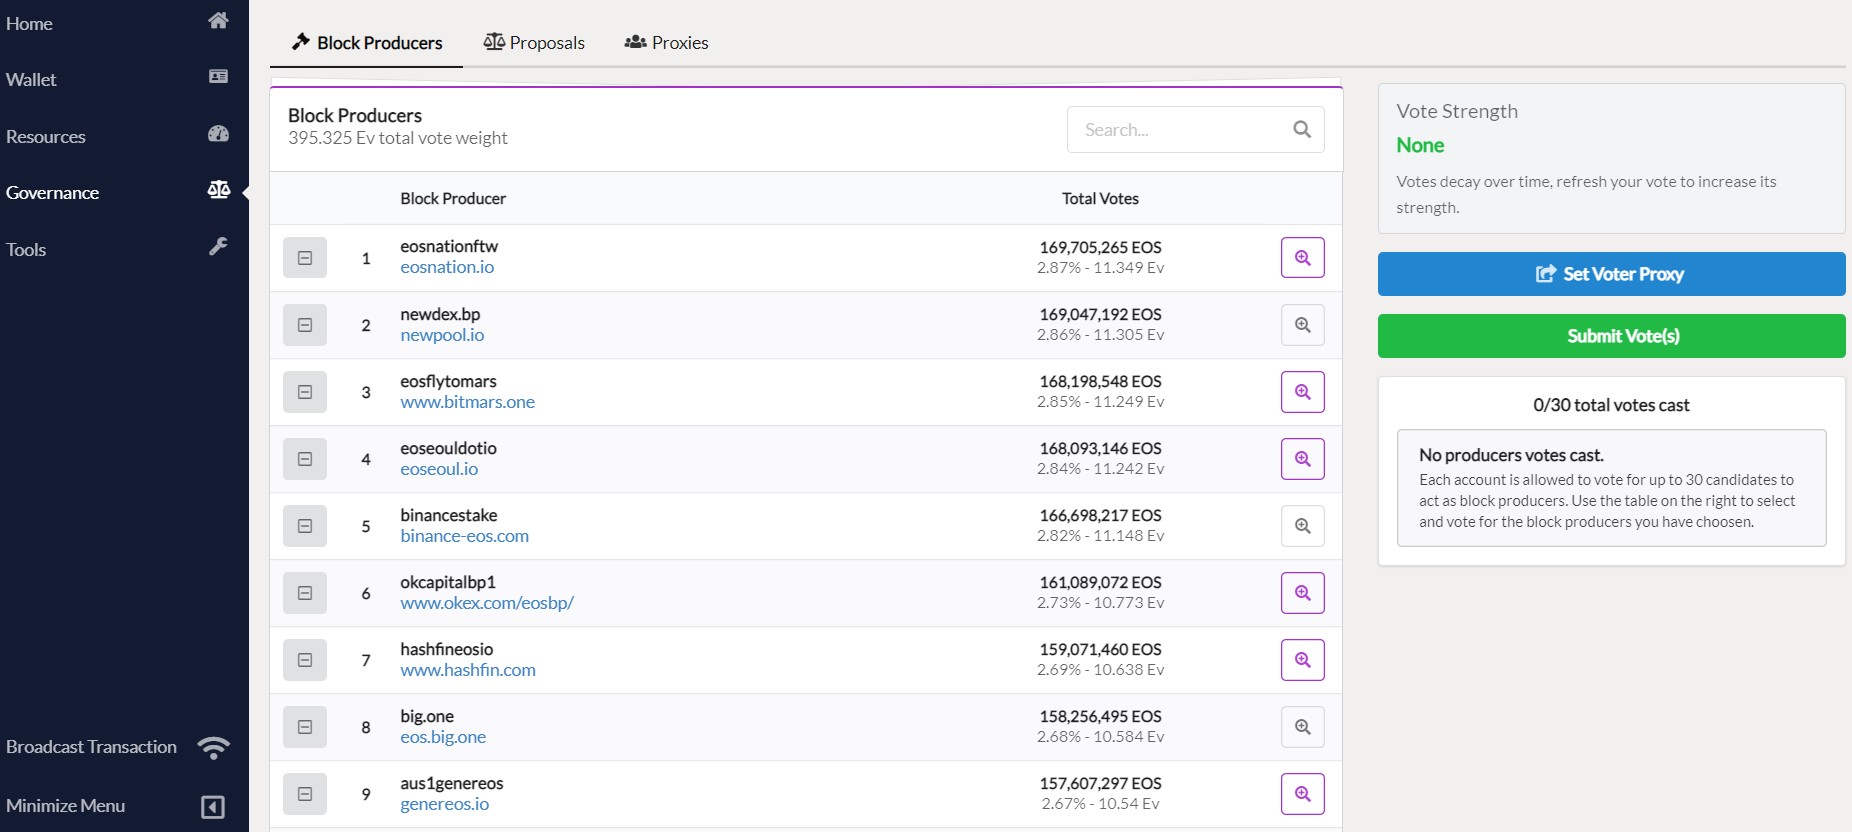
Governance
From the Governance tab, you can check the list of Block producers. You can give your voting power to a trustworthy proxy voter.
Just click on the Set Voter Proxy, and search for the account name of registered proxy voters. You can revoke your power anytime.
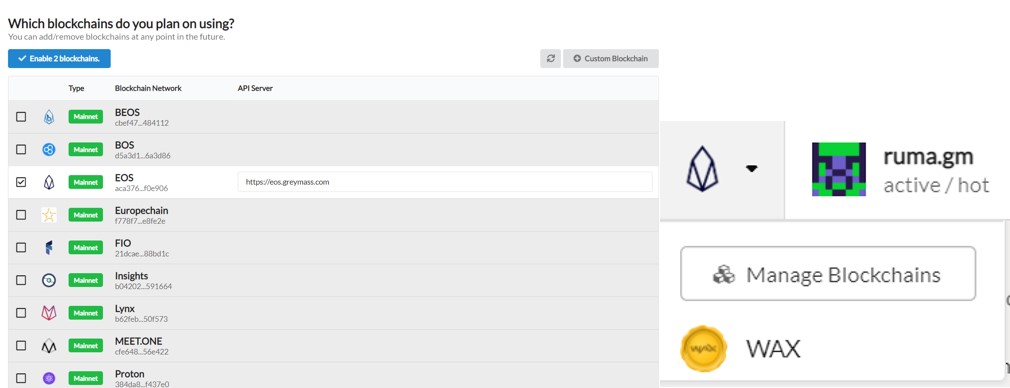
Manage Blockchain
As we have explained earlier, Anchor wallet supports various EOSIO chains. You can find the Manage Blockchain option at the top of the page. Click on it, and it will display all the test-net and the Main-net networks. Select the check-box against the network that you wish to use, and the selected network will be added to your network field. See the below screenshot, we have added the WAX network.
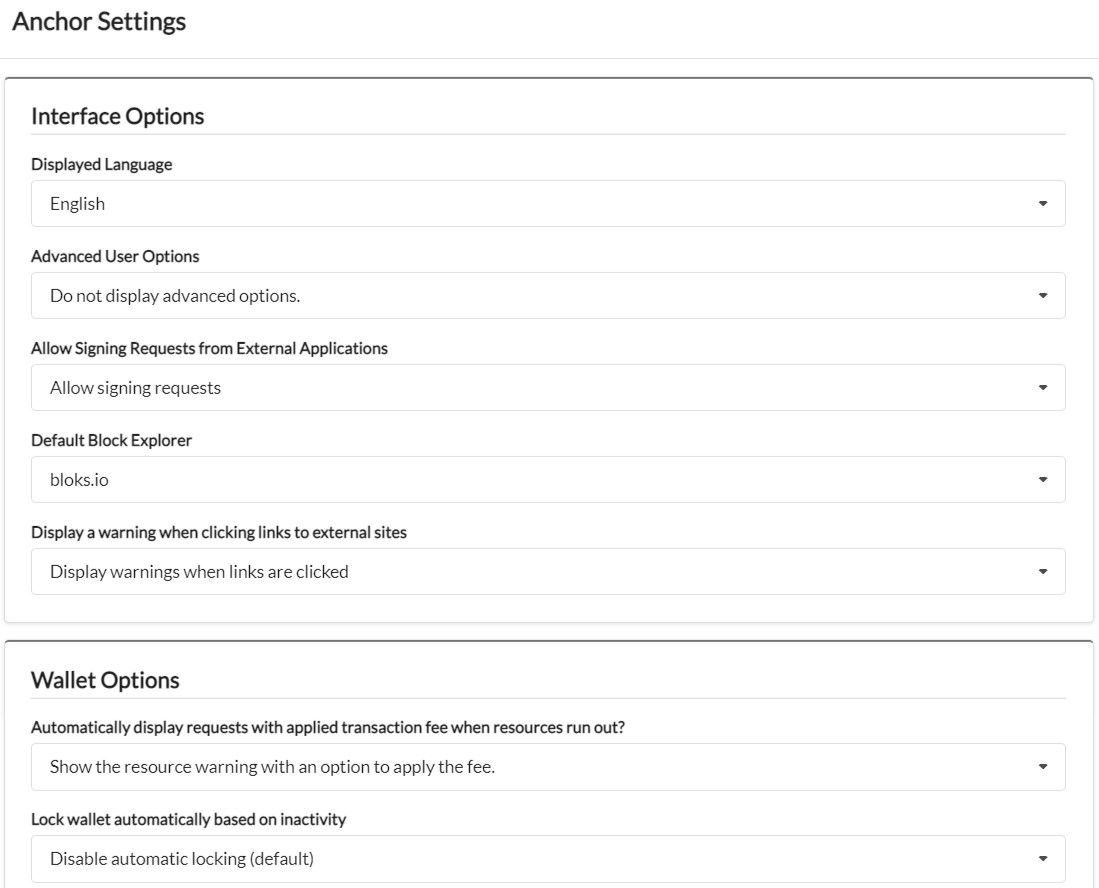
Settings
From the Settings tab, you can check/update the below important features:
- Language
- Enable/ Disable option to show advanced option
- Enable/disable options for signing requests to access an external application
- Block Explorer
- Display warning message while connecting external applications
- Wallet timeout
- Reset application
And a few more parameters can be set.
You can also read our guide on one of the famous NFT marketplace on WAX, i.e Atomic hub here.
⬆️Also, for more cryptocurrency news, check out the Altcoin Buzz YouTube channel.
⬆️Above all, find the most undervalued gems, up-to-date research, and NFT buys with Altcoin Buzz Access. Join us for $99 per month now.


