


")


 Tokens Playing This P2E Game")

Staking on Matic’s Mainnet is going live by June 29. Community members who registered for Matic’s Staking Education Initiative can get a first-hand experience of how staking will be.
Matic’s Mainnet had gone live on the 1 June 2020. Step 1 of the rollout of mainnet had the network started with a set of 7 Matic Foundation nodes. DApp partner nodes are soon to follow.
The next big thing coming up is staking which is happening by 29 June. In preparation for staking, here is a walkthrough of how anyone could become a delegator on Matic. Any user can be eligible to be a delegator, all you need is an Ethereum account.
How to Become a Delegator on Matic
The Matic Validator Dashboard only supports Metamask as of now. To begin, you will need to download the Metamask extension on your browser. The recommended browsers are Google Chrome or Brave. There are some issues with Firefox when using the Staking Dashboard.
Once you have Metamask installed and logged in, select the Goerli Test Network.
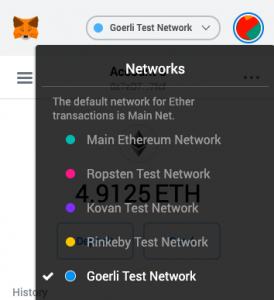
Make sure you have the Staking Token added to your Metamask. You can learn how to add custom tokens to Metamask in this guide. The Staking Token contract address is: 0xAFfb23A344B7ebdf4Ea6B5ec27ECC00D12fecd77.
Delegate to a Validator
Once you have logged in to the staking dashboard, users will be brought to a screen of validators and stats.
There will be an option that says “Become a Delegator”. Scroll down the Validator list, there is a delegate button beside each Validator. Click the delegate button to select the Validator to delegate to.
Note: Participants should make sure that they only delegate to the first 10 Validators.
Once the delegate button is clicked, users will be directed to a screen as below:

You can choose any amount you want to delegate in the ‘Stake’ column. The projected rewards per checkpoint will show once you add a value of the amount of Matic to stake.
Clicking ‘Delegate Now’ will confirm your decision and there will be two confirmations asked to sign from your Wallet. A success message will appearance your delegation transaction is confirmed.
Anyone is allowed to have multiple Validators using the same address so feel free to try it out.
If you want to access your Dashboard, click on My Delegator Details. You will be able to see your balance, total stake, and more.

Claiming Rewards
Here comes the part which most people will be looking forward to. Clicking on the ‘Rewards’ card brings you to the Rewards page. There will be a list of Validators you have delegated to with the rewards from each validator.
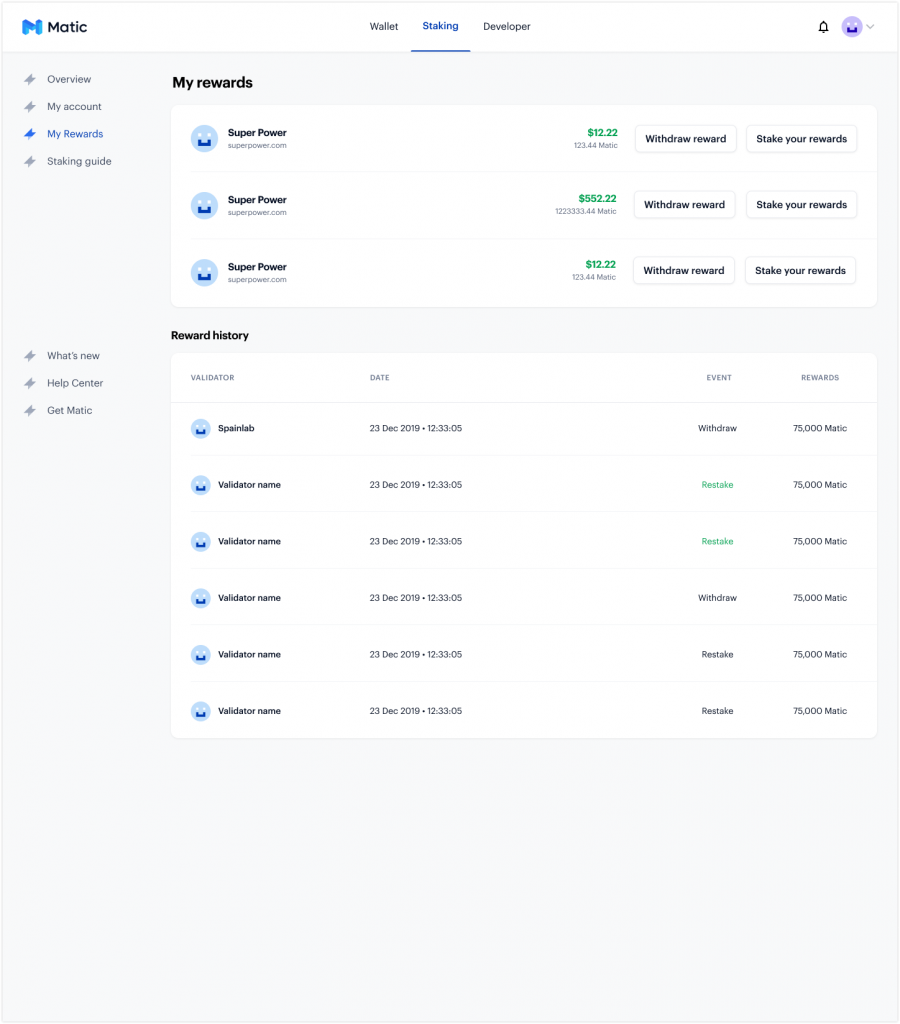
There are two options which you can choose. The first is to withdraw the reward. By picking this option, your rewards will go back to your wallet once you have confirmed the action.
The second option is to stake your reward. This allows you to further increase your delegation size on your current validators. There will be two confirmations for the action with the stake amount getting higher for the Validator you had selected.
Note: You only earn rewards as long as the Validator is earning rewards.
That is all you need to know about staking on Matic. It is a simple and easy process and the staking dashboard is very easy to navigate around.
To participate in Matic’s Staking Education Initiative, register here.
More from Matic
Matic Network Adds New DApp Partner Validators
Matic to Get Listed on Binance US
 Updates | July Week 3")

